12.05.2012

DIY Chalkboard:

This past week I was busy making Teacher gifts!  I was inspired by Shanty2Chic $5 DIY Chalkboard tutorial, but decided to make them out of shipping pallets instead.  Y'all know how I love my shipping pallets!  ha ha

I already had my pieces of pallet wood cut up, but I needed something smooth for the chalkboard part.  I originally wanted to use a wooden plaque design, but the size I needed were too heavy and thick.  I needed something thin, but solid enough to be able to write on it.
I ended up buying a 1/2 in. piece of Fiberboard from Home Depot, and was able to make 8 smaller boards from it.


Okay, this stuff is actually harder to cut than you would think.  We started off using a box cutter, then moved to a hand saw, and in the end just used an electric hand saw!  ha ha


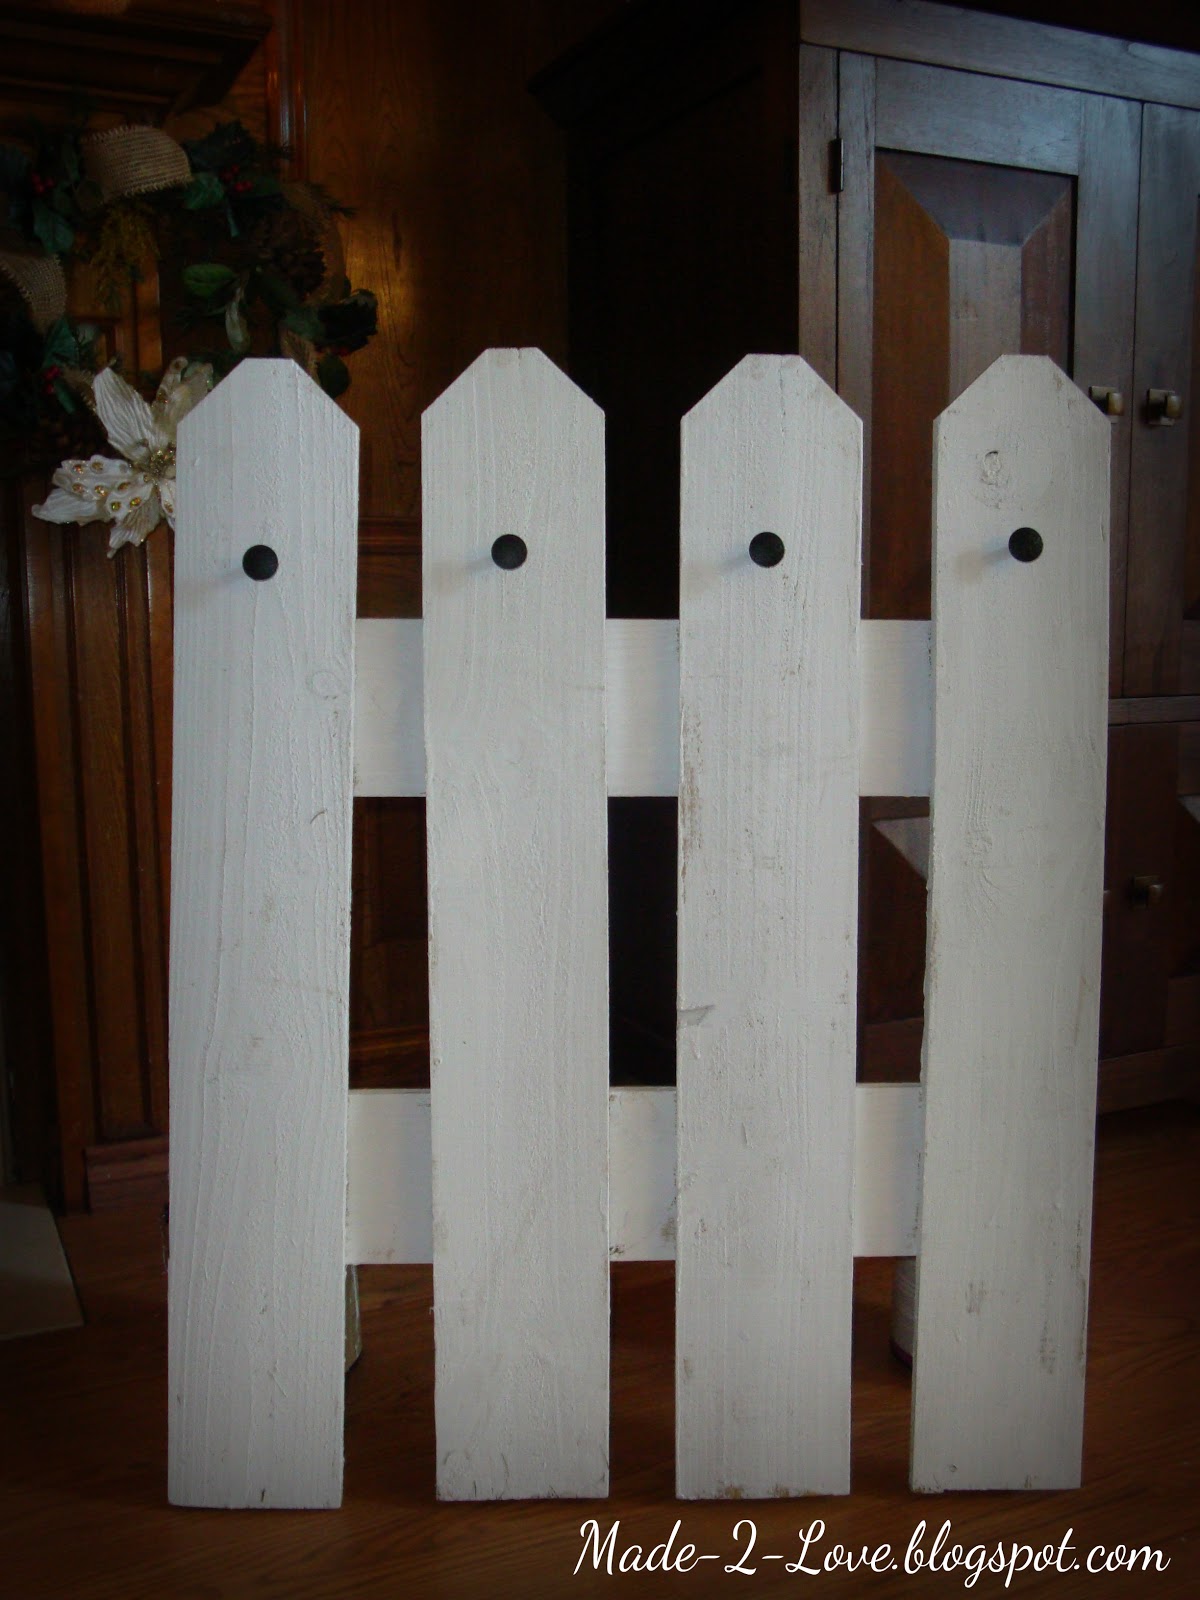
...and my assembled pieces of pallet wood!


Since I wanted them to have an antique look, I only applied 1 coat of water-based paint...
No need to make sure every piece of wood is completely covered in paint, just kind of quickly brush it on.  You're going to be sanding it down later.


After the paint dries, I applied stain to the edges, creases, or on any imperfections in the wood.  Wipe that off, and you're ready to sand it down!


I used chalkboard paint for the boards, but there is also spray paint available.  
Here's what it looks like after 3 coats of paint...
((FYI:  Chalkboard paint dries FAST!!!))


Screw the chalkboard onto the pallet wood, and...

TADA!


Display it in your kitchen...


For sweet lil' messages...


For the classroom...


For Christmas gifts...


I made these for Teacher gifts this year! 
Hope they like them. =)

~ Jenny xoxo


11.27.2012

Interior Wooden Posts:


We have this little open door way going from the living room to the kitchen, and I've always felt like there should be some sort of moulding/trim going around it, just to kind of separate the rooms, maybe?  Instead, it's just plain ol' sheet rock!  Blah!

Okay, so I looked...and looked...and looked through ALL of my pictures, and I couldn't find ONE picture that I had taken of this "walk-way", probably because I would crop it out of my pictures, I hated it so much.  ha ha

I did find THIS picture, very blurry, but this was taken when we were turning the dining room into a guest bedroom...


Here's another one...


So one day while I was re-painting the kitchen, I got this brilliant idea in my head to add wooden beams here.  We're planning on putting these on the outside porch, so why not put them indoors too?  
I already had some leftover wooden posts from the porch, so all it took was cutting them to size, drilling them in, and staining!  
That sounded easy, didn't it?  ha ha
Maybe not so much...I had to get the hubby involved, because #1...I don't like using the electric saw when I don't have to...ha ha  and #2...cutting wood into precise angles sounded too much like MATH...and well, Me and "math" don't get along too well. ;-)

So it went a little something like this...

After measuring and cutting the wood, here he is holding the pieces up for me to make sure that's the look I was going for before actually screwing them in...


Okay so, normally I probably would have stained the wood "before" screwing them into the wall, but I was on a time crunch...so I stained afterwards...


...and after staining:


Here's the porch I want to add the posts to as well...


...and here:


You can see Backyard progress here and here.

I may eventually change it to the moulding/trim I was originally talking about, or I may just keep it as is, depending on how the house revolves. =)

~ Jenny xoxo


11.25.2012

Peacock Christmas Tree:

Whohoo!!!  I'd say I'm JUST about done with my Christmas decorating!
I'm sure I could think of more to do, but sometimes I just have to force myself to stop so that I can actually enjoy the Christmas holiday!

Every year we have a tradition of going to pick out our tree the day after Thanksgiving...  

2012

This year I wanted a FUN Christmas tree, and since lately I'm into peacocks, that's what gave me the idea of a peacock-themed Christmas tree!

Here's how it turned out!

Night Time:


You can check out the Stocking Holder here.


Day Time:

Do you recognize these branches?
They actually came from the re-purposed flower arrangement I made for my daughter's room earlier this year.  It took up too much space in her room, and she no longer wanted it in there.  Sigh.  =(  That's okay though, I found a new use for it!  Tee Hee


Something else that I re-purposed were the tulle and felt peacock feathers from her Halloween costume...


...and more pictures of the Tree Topper...
...the two love-bird peacocks = The Hubby & I...awe. =)


...and the 4 feathery little pink birds = our 4 children.  Tee Hee =)


Bows & Burlap!!!


And aren't these cute?...mini chandelier's!


Have you started decorating your Christmas tree yet?
What color scheme do you use?  Do you change your tree up every year?

~ Jenny xoxo


11.18.2012

Christmas Stocking Holder:

About a month ago I was at a gift shop/garden center, and they built some fencing that wrapped around a few of their indoor Christmas trees.  I loved the idea, and quickly thought, "...that would be a great alternative to hanging Christmas stockings!"

Recently I pulled a muscle in my neck/back, so I had to recruit my hubby & kid's for this project, and I sat back and supervised! ha ha

With some leftover fencing, I had my son paint them white...


I had these knobs from Home Depot, that I believe were $.98 cents!


...and here it is!

They did a pretty good job, eh? ;-)
Or maybe it was just my awesome supervising?  ha ha


Here's what we used for the back:


I hope y'all are having a blessed weekend!

~ Jenny xoxo


11.09.2012

Christmas Picture Frames:

The Saturday before Halloween, my Sister was decorating one of her clients house for Christmas.  She asked if I would like to help her, to which I replied, "Yes, of course, ...duh...YES!"  ha ha  This meant an entire day without kiddo's doing what I love to do!...and let me tell you, it. was. wonderful! =)  

While my Sister decorated an 11 foot tree and staircase, I worked on these...

The lady had bought this one from a boutique...


I haven't seen anything like it before, but isn't that the coolest idea?  
Wouldn't they be great Christmas gifts?

These are the ones I made...
(I don't have any step-by-step pictures, but I used a hot glue gun to adhere everything to the frame.  I would kind of arrange things how I wanted them before actually gluing down.)


~ Leopard Print ~


~ Red & Green ~


~ Peacock ~
This one is my favorite, and one that she actually let me keep! =)


~ Red & Green ~


~ Gold & Green ~


~ Aqua & Red ~


~ Red & Green ~


I hope that sparks some ideas in your head! =)
I'm pretty sure this is what I'll be doing for Teacher gifts this year! ;)

That being said...I started my own Christmas decorating at my house.
Here's a sneak peek:


I've kind of always stuck with a more traditional color scheme for Christmas...red's & green's...Silver & Gold...with maybe a pop of some other color, like aqua!  This year though, I'm adding burlap!
I AM thinking of doing a pink & aqua Christmas tree this year...I haven't decided if I want to make that plunge yet.  ha ha

Have y'all started decorating for Christmas yet?
I know people have mixed feelings about putting Christmas decorations up even before Thanksgiving, but I look forward to Christmas...it's my favorite time of year!  
I also kind of like to take my time putting everything up, rather than this rush to get it all up so that I can actually enjoy it. =)

Hope y'all have a blessed weekend!

~ Jenny xoxo