10.15.2014

Entryway:

I must love constant chaos at my house...or something?!?

In the midst of Craft Show madness, and all the preparation that goes into that, we have more construction going on at our house!
That being said, you have no idea how EXCITED I am about this!

Ever since we took out our stairs, the Entryway wall looked very strange.  
The thermostat was now hanging out in the middle of this 2-story wall, and the return air filter grille was also just randomly hanging out.  
We would have to get a ladder to change out the filter, or to turn the air temperature up or down.
We were also left with this light fixture that once hung above the stairs.  It served no purpose anymore, and just looked odd sitting there.


I created a board and batten wall, to try and draw attention away from it all...


...but that only worked so well.  
When we would have guests over, you could see their eyes wandering.  ha ha
Also, above the french doors, there was supposed to be a "landing"??...just a place that I could maybe put a Christmas tree?  Instead, it was a piece of plywood that we kind of just laid down temporary.  It couldn't hold any real weight, but it also didn't really need to, because the railing was built around it.  So once again, just another "odd" thing about the Entryway!
I guess that's what happens when you take out your STAIRCASE??!!  
"Who does that?!"  LOL

With the holiday's coming up, I just wanted the downstairs FINISHED!  After living here for 5 years, you would think it would be.  I have a problem with always wanting "change".  I have changed around my downstairs sooo many times, that I haven't even really started working on the upstairs yet!

If you follow my blog, or you follow me on Facebook, you will know I LOVE DIY projects!  In fact, we do almost everything ourselves!
We even did the stairs ourselves!
Problem is, here lately, I have been non stop with my business!  I also have 2 Craft Shows coming up, and everything has been about that!

I've had to put the DIY projects on hold, except, I really-really needed these things done before the Holiday's!  We are hosting Thanksgiving!  Whohoo! =)

That's where my awesome neighbor friend's come in!  They own their own construction/remodeling company, and they do fabulous work!

I started making a list a few weeks ago of everything that needed done, big and small, that I just knew I would not have time to do myself.
Although, the Entryway wasn't something I would have done myself anyways!

Which brings us to TODAY...


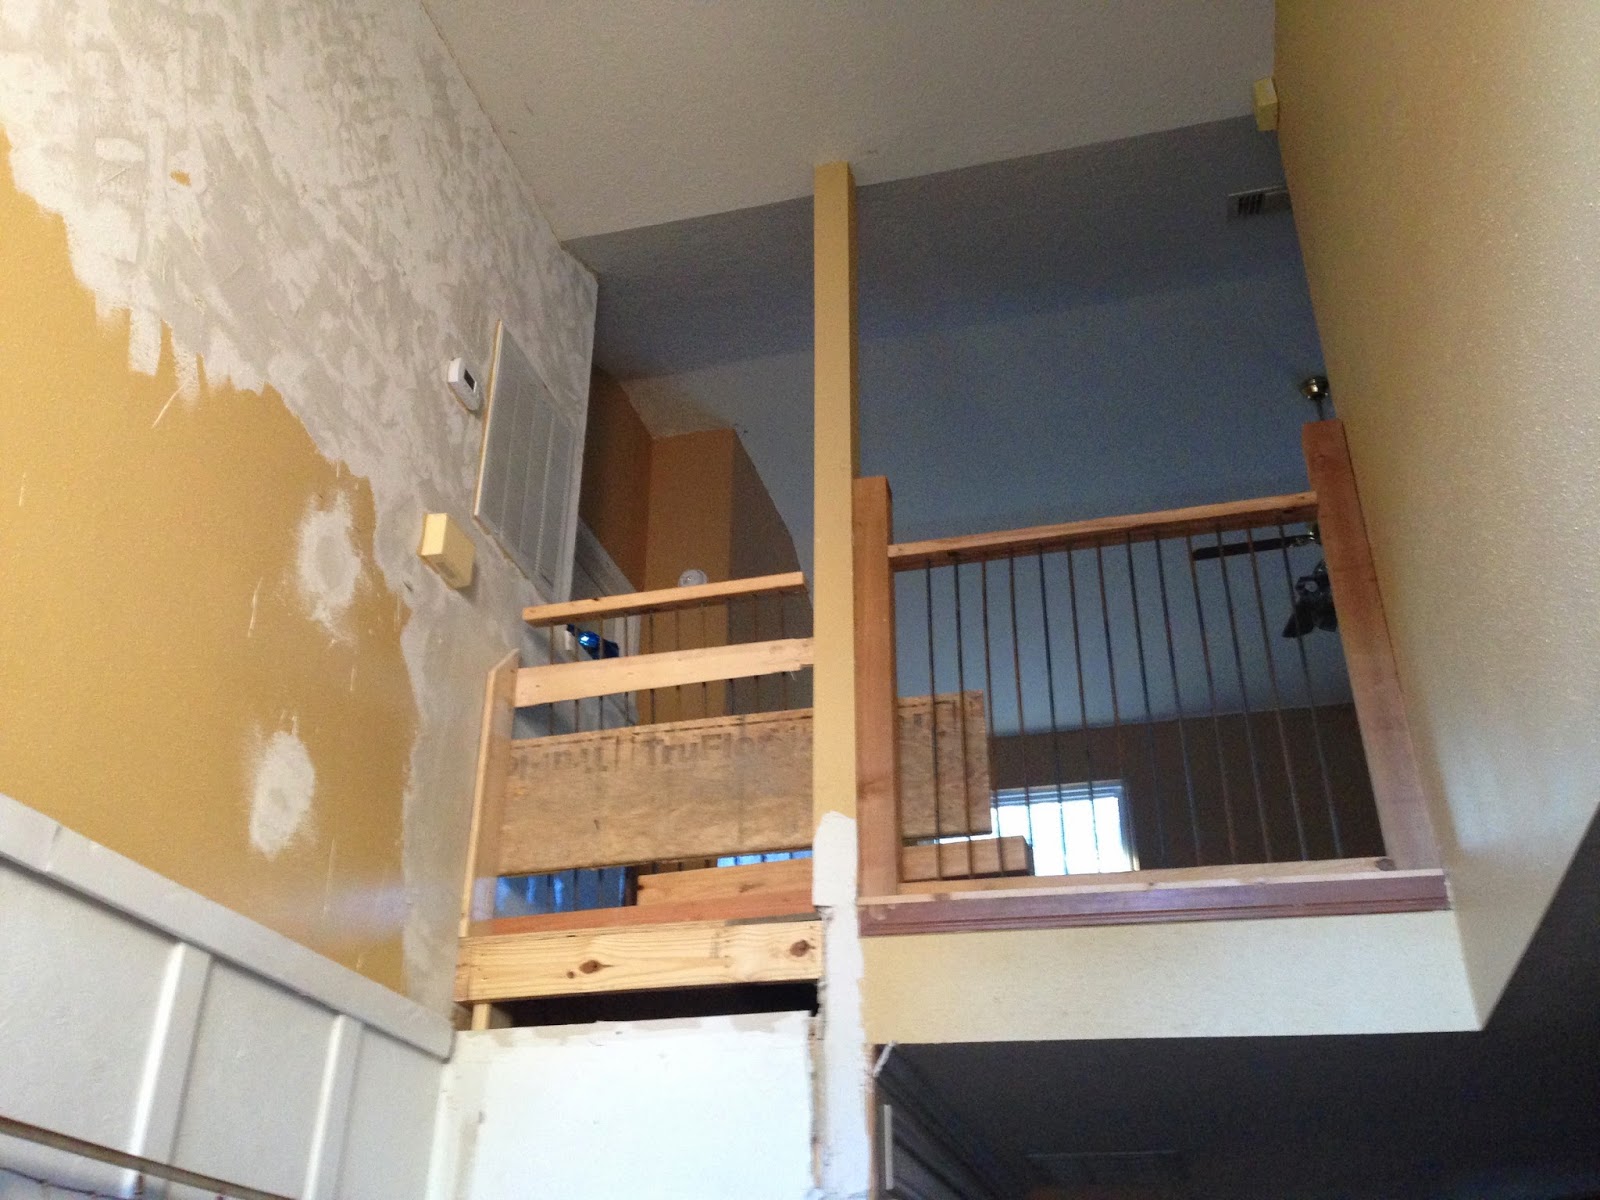
They are now extending out the upstairs floor, and the railing will go straight across.

We JUST installed our railing a few months ago, and we're already changing it. ha ha
A few month's ago...


To be continued...

~ Jenny


4.26.2014

Vintage Baseball Room (Part 2)

Sooo in LOVE with these GREEN doors!!!  
The bedroom is pretty neutral, so the green adds the perfect POP of color!


Benjamin Moore - Irish Moss


I used a combination of painting with a roller, and using an angled brush.


FINALLY after about 5 coats of paint, I was able to add the hardware!
And yes, I painted the back sides of each door as well.


The next day the furniture arrived!!!  
The kids literally stared out the window until they saw the trucks pull up!

 
For us, it's not always an easy feat to get furniture upstairs.  We have spiral stairs, therefore, we must hoist furniture up over the banister.
We had about 4 men + my teenage nephew helping lift the furniture to the 2nd floor.  I had quite the enjoyment, just standing back, and taking pictures!
Hee Hee


Please ignore the "bacon on the wall" aka Cedar planks!  That was a "project fail", and those are coming back down.


Here's the pallet wall!
I am adding some wooden slats to the window seat. 

 I am almost done in this room.  
I just need to add the window seat, put the plug socket plates back on, and add a few vintage decor. pieces!
Of course, a new fan, some crown moulding, maybe even a painted ceiling would be nice, but I think I'll just keep it at the minimum for now.

You can check out Part 1 on this bedroom re-do here.

~ Jenny xoxo


4.24.2014

Vintage Baseball Room ((progress))


Recently we have been doing lots of Spring Cleaning!  
While doing so, we also re-arranged the kid's bedrooms.  Our daughter moved to the previous Guest Bedroom, partly because that room was already painted in girlie colors!  We felt like our oldest son needed his own room, so he went in the smallest bedroom, so that our other 2 younger sons could share the biggest room.

Since the biggest room was once our daughter's room (that we never did finish painting), that ended up being the only room that we would need to re-paint.

Around this time, a really good friend of mine asked if we needed a bunk-bed set!  I was ecstatic!  Not only was she giving us the bunk-bed, but also the mattresses, and bedding that it came with!  My 5 year old is so excited about the new desk that comes attached to the bed, and this is the first time my 2 year old will be in a big boy bed!
(THANK YOU, Kelly!  You have been such a blessing to our family!)

Down below I created a mood board...

Neutral with a pop of Green!
I already have the pallet wall in this room, and the Sports bedding is going to go perfect with the Vintage theme I had wanted.

The walls are painted Going To The Chapel - Benjamin Moore
...and the accent green is Irish Moss - Benjamin Moore

(Thank you Young House Love for the Inspiration!)


So today we worked on clearing out the bedroom & painting!!!

...because we have spiral stairs, it's not always an easy task to haul furniture up and down the stairs...


BEFORE:


My 5 year old helping mix the paint...


Progress:


More Progress...


Tomorrow's agenda:

- give the trim a 3rd coat of paint
- paint the doors!
- add new plug socket plates
- add new door knobs.
- build a bench by the 2 windows! 

~ Jenny xoxo 


3.11.2014

"Love Story" Pallet Art:

I gave myself a few months to recuperate from the 2 craft shows I did last Fall/Winter.  You can read all about that here and here.
In fact, for the past few months, I don't think I've made any pallet art at all!  Instead, I've switched gears a bit, and I've been working on projects around the house.

We're in March now though, and November will be here before we know it!  I don't want to fall into the same predicament that I was in last year!  Last year I started working on craft show pieces only 6 weeks prior to the Craft Show!

My plan is to start early this year, work on a few pieces each week...that way I don't have as many to make right before the Craft Show!

And what better way to get myself back into the groove of things again, then with this custom piece!

This piece measures about 41" x 32" 


~ Jenny xoxo

I would love for you to stay awhile!  
On the right side bar, you'll see where you can Follow Me on Facebook!


3.02.2014

Angle Grinder, Rebar, and a little update...

Originally I wanted to buy 20 ft. of Rebar, but we couldn't get it home without cutting it at the Store.
Apparently though, no one could cut the rebar at the Store.  You would think they would have a tool for that, but they only had bolt cutters...that didn't work.

So we left with no rebar, and I returned to another Store the next morning.  No one could cut the rebar there either, so I ended up buying about 70 pieces of 4 ft. rebar!  Lucky for me, the manager discounted them down to $1.00 a piece. 

My Dad was for sure we could cut them down to 3 ft. with his 16" bolt cutters...

He was able to cut ONE, but there was NO WAY we would be able to cut 70 pieces!!!

This is me trying ((unsuccessfully) to cut 1 piece of rebar!!!


So I left to go pick up some bigger bolt cutters, and came back with an Angle Grinder instead...oh, and an awesome Face Shield!

 
Ummm...this may be my new favorite tool!!!

It's called an Angle Grinder!!!

I'm using it to cut through the Rebar, and it works wonderfully!


So here's a quick look at exactly why I'm cutting Rebar...

((excuse the mess.  I JUST cleaned my entire house, and now I need to make a trip to the Donation drop-off!))

We are building Staircase Railing made out of Rebar!
I say "we", but there is no way I could do this without my awesome Dad!...he's got some major skillzzzz! =) 


My inspiration:

Such a great idea. Rebar for spindles in a rustic log cabin. 
So that's the latest update on the DIY Spiral Stairs!!!
...almost DONE!!!


~ Jenny xoxo

Follow me on Facebook!


2.24.2014

Faux Barnwood Pantry Doors:

After I installed the Decorative Hardware to my Garage Door, I was left with 1 remaining kit.

I've been wanting to paint my pantry doors for awhile now, but it wasn't until I bought the hardware, that I knew what exactly it was that I wanted to do.

BEFORE:


Just look how pitiful this is?


I applied 3 different types of paint to achieve this look...

I used an Interior Glidden paint called TILLED SOIL for the base coat.  Then I brushed on some black chalkboard paint.  I could have just used regular black paint, but chalkboard paint is what I had on hand.  For the final coat, I used
Martha Living specialty finish called HACIENDA.  For the final step, I distressed the edges a bit.

(Just a side note, the first 2 pictures below were taken with my phone...that's why the paint looks neon green.  ha ha)


I didn't worry about the edging, because I'm re-painting the walls anyways...

After the 3rd coat, I put on the Carriage Door Hardware.


My kitchen has a country, shabby chic, farmhouse look to it, so the faux Barn doors go perfectly! =)

~ Jenny xoxo

Check out my Faux Carriage Garage Door here.

Link Party:  Too Cute Tuesday