4.30.2013

Guest Bedroom:

Finally finished the guest bedroom last night, but had to wait for daylight to take pictures.

This bedroom is not 100% complete...still need to add picture frames to the walls, fitted sheet to the box-spring, knobs to the doors, edging on the floor, etc.
...but I ran out of time, so those things will have to wait.

I'm going to do something a little different this time...I have tons of cleaning to get done before guests arrive tonight, sooo...

This post will be ALL about PICTURES!!!...and I will update y'all later with all the details on where everything came from, and how I painted the furniture.


You can read ALL about how this room got started here.

...and stay tuned, guest bathroom pictures will be posted soon!

Thanks for looking!!!

~ Jenny xoxo


4.28.2013

Weekend projects...

What a week!!!
I seriously have been NON stop!!!!

On Saturday, my Sister's neighborhood had a community garage sale.  So 1/2 the day I was shopping, and the other 1/2 I was cleaning!

I can't wait to show you all of my garage sale finds!!!...another day...another post. ;-)

We have some guests that will be staying at our house this week, and my brother (home from college) will be staying with us over the summer.  Our original plan was to clear out our current computer room that is downstairs, and have them stay in there.
Then we decided it might be best to clear out the junk room storage room upstairs, and make it a more permanent guest room.

That decision was made this morning (Sunday)...our guest arrive Tuesday!!!  Eeek!!!

I'm almost embarrassed to show you, but this is what our "storage room" looked like.  When we moved here 3 years ago, these were what the walls looked like...a mod podge of red, white, and blue!

We really have no place to store anything since we have no garage, no basement, and attic space is very limited.  The containers contain all of my husband's memorabilia...he "says" that once he has his "man cave", he'll be able to properly display everything!  Hmmm...

The kid's would also sometimes play in here, and I would let them draw on the walls.

It was just a MESS!!!...as you can see!


...and at the end of the day it now looks like THIS!...


It's kind of nice to have another functional room!

Downside is, all of my husband's "memorabilia" is now in our Master Bedroom!  Ugh.
Hopefully we can come up with a better solution...maybe a storage unit?  Tee Hee

On tomorrow's agenda...

Texturing & Painting the bathroom!!!

UGH!...look what I have to look forward to!  Blah!


...and my favorite part...

DECORATING the bedroom and bathroom!!!

So there's more to come!

Thanks for looking!

~ Jenny xoxo


4.17.2013

diy Spiral Staircase - Part 2

Hey Y'all,

I know it's been a while since my last diy Spiral Staircase update!!!
Truth is, Part 2 has been done for a while now.  With 4 kiddo's running around, sometimes it's hard to keep that section of my house clean enough to quick snap some pictures.  ha ha  
So what you see is a clean, clean room!...ha ha ha Not quite.  "Behind" the snap shot is actually baskets full of toys that the kids need to put away when they get home from school...and a dining room chair that needs to go back into the dining room...and well, a bunch of other odds and ends just layin' around!  

Just keepin' it real! =)

You can read ALL about Part 1 here.

So let's get started!!!

Some lovely lilies from the garden...my favorite flower, that I picked especially for this photo shoot. =)


We finished the railing, spindles, and finally bolted the pole down!
I think the pole was supposed to be bolted down first...ha ha...awe well.


...new Mantel display...


For the railing:

A little trick for ya...just in case you decide to build one of these in your own home!  ;-)
The instructions say that for installing the railing, it's a 3 person job.  One person at the top, middle, and bottom...JUST to hold the railing in place.

There were only 2 of us, so we improvised...

We taped the railing onto the spindles first, then proceeded...


We used a smaller drill bit first to screw through the small hole on the silver piece of hardware, just to make a mark...


Then removed the tape, and used a bigger drill bit to make a bigger hole where our smaller hole was...


The drill bit has to be big enough to where this butterfly screw will fit through.
Once you push it through the hole, you'll hear a snap!  That means the butterfly opened inside!


Then you just tighten the screw!


Once you do about one or two spindles, the rest are pretty easy!

Okay so, I'm not sure WHY I didn't take any pictures of us installing the swirl spindles...

But basically we just laid them out how we wanted them.
We had to make our own holes through the metal spindle, so that kind of took a while, but was pretty easy.

Still lots more to do!!!

We still need to patch up the hole with some drywall.  I want the wood framing to be visible, and I'm going to be staining that.

THEN, it's demolition to the other stairs!!!  Eeek!

Thanks for looking!!!

God Bless!

~ Jenny xoxo


4.16.2013

Re-purposed Chairs Into A Bench:

I was driving home one day last week, and someone had these 4 chairs out in their trash pile.  Each of them were labeled with a $5 price tag.  ha ha
I didn't have any cash on me, but was able to scrounge up $10 from the cash my kids had on them.  I handed the owner of these nice chairs over several one dollar bills, and LOTS of change.  He must have felt bad for me, because he let me have all of them for $10.00.  =)

I brought them home, not sure what I was going to use them for.  They were kid-size, not real wood, and a little wobbly.

I tried 2 of them out around the Gaming End Table, and 2 of them around the Distressed Kitchen Island for about a week.
It just really never worked out for those chairs, until one afternoon while I was cleaning, I remembered seeing something on Pinterest about up-cycling chairs into a bench!

YES!...That's it!...I needed more seating around my Dining Table anyways!

Luckily, I already had everything I needed.  
Without hesitation, I went to work!


This was very easy...just laying boards side by side, and screwing them into each chair...


I then took the bench out front ((more open space than the back yard)), put my ear plugs in, turned the music up, and began spraying!!!
I'm sure my neighbors wander about me. ;-)

I used Rust-oleum Universal Satin Paint & Primer In One...

Rust-Oleum Universal 12-oz. Universal Paint and Primer

After it dried, I took a bit of stain around the edges, and sanded the whole seat down!

Here's a close-up...


Here's a side-by-side view of the Before & After:


And now it fits nicely with the rest of my Dining Set!


Thanks for looking!

~ Jenny xoxo

I would sure LOVE your vote!


4.15.2013

Upcycled Crib to a Bench:

I woke up this morning, and couldn't move...every inch of my body is sore!  This past weekend I ran my 1st Graffiti Run 5K...actually, my 1st 5K EVER!  It was only 2 weeks ago that I couldn't even run a mile!!!...but more on that later! 

Before then, I was working on another bench project, this time from a crib.
A Jenny Lind crib, to be exact.


I would say that this was a lot easier than the bench I made from a headboard/foot board, because I basically built it the way you would assemble it as a daybed/toddler bed.  The only difference is that, I screwed the pieces together, rather than use the same hardware that came with the crib.  By doing it this way, I was able to use one of the sides as a shelf to go underneath.

The very first thing I did was cut off the bottom of the legs.  I did this because I wanted it to sit lower to the ground like a bench.  

The picture below was after all 3 sides were screwed together, but before I added the shelf...


...and here's after...


I'd like to give a shout out to my awesome hubby for helping me with this!  The pictures make it look easy, right?  ha ha...wrong!
You should have seen me trying to hold all the pieces upright by myself!  

Now onto the FUN part...painting & glazing...then sanding it all down to give it a distressed look!

I used Rust-oleum Universal Paint & Primer In One...


If you're going to be painting a crib as well, you really need 3 cans of spray-paint, but could get by with 2.

After that dried, I went over it with a Golden Glaze.  
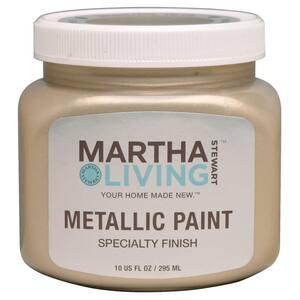
Martha Stewart has one that I really like...

Martha Stewart Living 10-oz. Golden Pearl Metallic Paint

I used an old towel to rub some on and around the creases.  You don't want to cover the entire piece with glaze...ha ha  Just a bit here and there.

Then sand the whole thing down!!!  
...but just like the glaze, just a bit here and there, and pay special attention to the edges.  Just to give it a natural distressed look.

Here is a close-up picture so you can see what I mean...


I bought this metal design from Hobby Lobby to add to the back...


Wouldn't this be such a cute reading nook for the kids?
You could keep their books underneath on the shelf...


...or you could add some baskets underneath.
Maybe use it as a bench at your entryway...

Of course, the way this was built...there IS a weigh limit, so I'm sure you'd only want the kiddos to be sitting on this.  =)

Here's a side-by-side view of a Before & After...


Now...back to my Graffiti Run...

It was a BLAST!  I highly recommend you checking one out in your area!


God Bless!

~ Jenny xoxo