5.27.2013

Chalkboard Tags:

School is coming to an end!!!  Yea!!!
I wanted to show y'all how you can make some CUTE little name tags for end-of-the-year Teacher gifts!

I just cut up some scrap pieces of wood...


I used a Compound Miter Saw...


...sanded them down around the edges...


Sprayed them down with some black spray paint!  It doesn't have to be perfect, because you're going to distress them anyways.


I used a drill bit to make my holes...


Sand them down again to get the distressed look...


I then painted each one with 3 coats of Chalkboard paint...


...and TADA!!!


Have a blessed day!!!

~ Jenny xoxo


5.26.2013

Upcycling a Headboard/Foot-board to a Bench:

I am sooo excited to show y'all just how EASY this next project is!!!

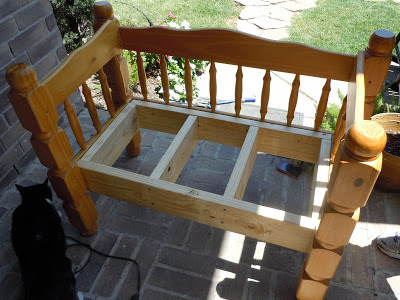
My very first headboard/foot board turned bench was this one...

And you can read ALL about it here.


The problem with that one was, I wasn't quite sure how to build it sturdy enough to hold an adult.  So it became more of a decorative piece, and my children sit on it at times.

This was such a big hit, that I really needed to figure out how to make it solid so that I could actually sell them!

My Sister came over that day, and we figured this out together!


We took our plan to Home Depot, and after talking with someone there about our plans, we came up with this...

Step 1:  Cut your Foot board in half. 


We did this by using a Circular Saw.

12-Amp 7-1/4 in. Circular Saw

To assemble the bench, each headboard/foot-board is designed a little bit different.  On this one, we were able to just screw part of the foot-board right to the side of the headboard piece.


We used 2 x 6 to make the base...


For the top, I believe we used some 1 x 4's


To make our cuts, we used a Compound Miter Saw...

Ryobi 14-Amp 10 in. Compound Miter Saw
This one was mine, and we basically built it exactly like the one above...


...except that we had to attach the Foot-board just a tad bit differently...


And here they are!!!


We painted and distressed them with 2 different colors of Aqua...


"See!!!  Easy-peasy, right?!"

~ Jenny xoxo


5.25.2013

Taking out the 80's Wet Bar:

I am sooo excited and relieved that I can finally see the light at the end of tunnel for the Stairs remodel!
It is such a cool feeling to see something you have envisioned, come to life!

So I left you off here, demolition of the stairs - Part 2, where we took out the stairs and 80's wet bar! 


We did hire some help to put the french doors in, but to keep the costs down, we took out all of the framing and drywall ahead of time.

Behind this wall is what separates the garage apartment to the main part of the house.  We decided to put some glass french doors here, to bring more natural light into the room.  Also, in the future, we're planning on possibly converting it into the Master Bedroom, so it'll be nice to have a door right off the main living area in the house. 


I knocked out all the drywall, then had my hubby cut down all of the framing...
(That's my brother making the goofy face in the background...haha)


We had someone come out to install the door, and so this is where we're at now...


Here's a side-by-side view of the progress...


By putting a door there, it really opens up, and extends the downstairs living area! 

If you're just now following, we took out our stairs, and put in a spiral staircase.  You can read all about that here.

Thank You so much for looking! 
I'd love for you to stay awhile, follow me on Facebook! =)

~ Jenny xoxo


5.19.2013

Front Door Shutters:

While browsing the internet I came across a picture with shutters on each side of the front door.  I stored that idea in the back of my head, until one day I came across these...

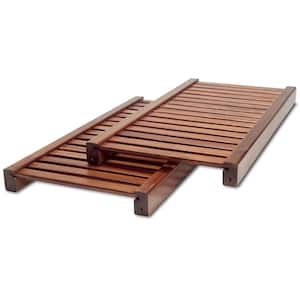
Someone was selling individual packs of shelf kits for $5.00 each!  They run about $50 each at Home Depot!
And in case you're wandering, they are called:

John Louis Home Deluxe Solid Wood Red Mahogany Closet System 

John Louis Home Standard 12 in. Solid Wood Red Mahogany Adjustable Shelf Kit
Here's what they are used for...

John Louis Home Deluxe 16 in. Solid Wood Red Mahogany Closet System for closets up to 10 ft.

My first thought was, "Hey!!!  I could use these for my shutter doors!"

So I bought 2, and of course later I wish I would have bought more!  I would have totally put them on my 3 windows at the back of the house!  Ah well, I'll just stick to my original plan...

So here's the "before" picture...


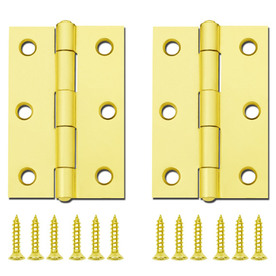
In order to install them, I used Entry Door hindges...

Gatehouse 3-in Brass Plated Entry Door Hinge
Below you'll see I drilled my holes first...


Then I just screwed the other side into the moulding by the front door...


I realize that this is a little different, but if you've been following my blog for a while, you'll notice I'm a little different.  ha ha
Like knocking out our main staircase to put in spiral stairs..."Like who does that?!"  ha ha ha  "Me!  Me!  ME!"

Hey y'all, if you like what you see...Follow me on Facebook!  You'll see the link to the right of the page!

Thanks for looking!

~ Jenny xoxo


5.11.2013

Demolition of the Stairs: Part 2

Ready for an update on the stairs??

You can read ALL about "Demolition of the Stairs: Part 1" here.

This is where we left off from the last post...


...and now we are here...


...after taking apart the steps.  
That was pretty easy, and just consisted of unscrewing all of the screws.


My Dad used a Reciprocating Saw to tear apart most of the stairs...


We were hoping to salvage the wet bar, but weren't able to.


And this is how it looked once all the stairs were out!!!


Then we started tearing out the wall where the glass french doors will go...


Just so you can get an idea of what our plans are...


...and by the end of the day it looked like this...


...and just for fun...

This is currently what our back yard looks like!  Eeek!
We're trying to salvage all the wood we can, so we're storing it in the backyard until we have time to go through it all.

What. A. MESS!!!


There's more to come...

Thanks for looking!!!

~ Jenny xoxo

P.S.  If you're just now following, and wandering why we're taking out our stairs...

We built spiral stairs, and you can read ALL about that here.